I’m so super excited to share this video with you! It features the new Gel Printing Kit from Taylored Expressions, along with a lot of stamp and die products. This was my very first time using a gel press and, wow, I can’t believe I haven’t before. I also used two new stencils, Wild Willow and Make a Dash, to create patterns on my panels and these are available for individual purchase.

I was mesmerized by how fun, easy and relaxing it was to create so many beautiful backgrounds in a short time and I’m so grateful that Taylor assigned this kit to me because I probably never would’ve tried gel pressing otherwise. I’m completely addicted now and I have a feeling you will be, too!

It’s really hard to believe that all of these beautiful prints resulted from only three paint colours, plus white. Of the dozen or so prints I made, plus all the brayer cast-offs, it was so hard to pick a few favourites to turn into card panels but at least I have quite a stash to choose from for my next set of cards. I ended up with four favourites and these all coordinate beautiful if I decide to gift it as a set.

I trimmed this first panel down to 4″ x 5.25″ and used the largest of the Diagonal Stitch Rectangle Stacklets to create a framed impression. Then I stamped On the Block – Mom, first with Lollipop ink and again with sparkle embossing powder. After heat setting and die cutting it, pulled a sentiment from Mini Strips – Fun & Funny which I had already stamped in my Simple Storage for Simple Strips.

I turned On the Block – Mom upside down so it reads as WOW and popped up both parts of the sentiment on foam tape. Then I die cut Gathered Stars from silver glitter cardstock and embellished the card.

On my second card, I created a Blueberry card base and used the Frame in Frame 2 Cutting Plate on the gel press print. I stacked the outside of the frame on a second layer of Sugar Cube cardstock so it would be slightly raised in comparison to the centre of the frame.

I stamped the sentiment from Oh My Word – Happy Birthday in Blueberry ink and cut it using the coordinating dies. I die cut the same sentiment from vellum cardstock and used that to line up and adhere the letters to the panel.

To finish, I popped up the bottom of the sentiment with foam tape and used scissors to trim trios from the previously die cut Gathered Stars. I attached those to the card using Bearly Art liquid glue.

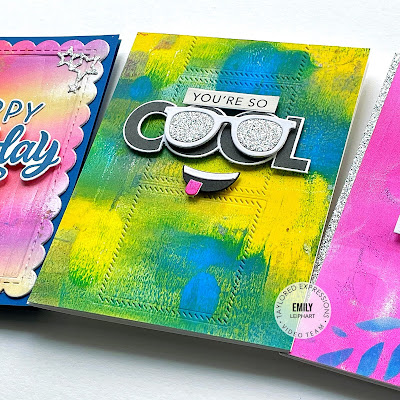
I’m most excited to talk about this third card because the background was not one of my favourites when I first gel pressed it but then it quickly became a favourite. I just love the boldness and purity of the colours. Plus, it makes a fantastic masculine/kid card which are both hard to make!

This is the only one of all four cards where the gel pressed panel is a full A2. I used the smallest of the Diagonal Stitch Square Stacklets to create a column of squares down the centre of the card, centring the first one around the sentiment and working from there.

I stamped both On the Block – Cool and Building Blocks – Cool Additions in Oreo ink on Sugar Cube cardstock. Then I die cut Shades of Summer in both Sugar Cube and silver glitter cardstock. For the mouth, I used Build an Emoji where the tongue was die cut from a leftover sliver from the pink panel of the fourth card.

My last card is one where it’s most obvious that I used the Wild Willow Stencil but it’s also the print that features mostly one colour. I kept both the designs and the sentiment ultra simple to allow the print to shine.

I cut a quarter-inch strip of silver glitter cardstock and attached it to the left edge of the card. I trimmed the panel down to 4″ x 5.5″ and attached it flush to the right edge of the card. Then I heat embossed the Oh My Word – Thank You sentiment using Sugar Cube ink on Oreo cardstock. Again, I pulled a sentiment from Mini Strips – You’re the Best which I had already stamped in my Simple Storage for Simple Strips.

I hope this post has inspired you to try something new! If you’re interested in trying the gel press for the first time, I highly recommend the Gel Printing Kit since it comes with everything you need to get started.

Thanks so much for watching!

Supplies


One thought on “VIDEO | Taylored Expressions | Gel Printing Kit”

Leave a Reply

Your email address will not be published. Required fields are marked *